Let us start with an overview which talks about installing and then “record and playback” and follows with a simple example. Later on we will discuss in depth.
1. Install Ranorex from links given in website. You can use this link also. http://www.ranorex.com/download.html
2. After installation, Open Ranorex and choose “New Solution”


3. Now, give a name to solution. For example. MyFirstProgram
Note: Ranorex supports C#, Python, VBNet. If you are comfortable with VB dot net then select VBNet. But here, we are going with C#.


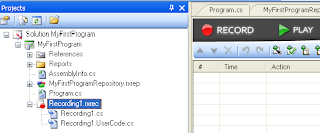
4. Here, You can see the Hierarchy of the Tree Element

5. You probably want to record and playback. You have to just click on Record and perform operations and then stop recording. It will generate some code. To run the same operation by ranorex just click on Play. It will do the same work what you have done just now while clicking on record.
Note: After clicking on Record you can see a recorder. Once you are done with the operation just click on Stop Button.

6. you can see the code that has been generated in Start function under Recording1.cs


7. Here, Recording1 is Class and Start is a function.And you can see how this function is being called in Program.cs. So, when you run this solution it will call Start function [class name.functionname].


Note: In this Recording1.cs you can NOT do any modifications. If you want to modify any code then you can just copy the whole code which exists inside Start function and paste it in a new function under Recording1.UserCode.cs. And dont forget to call the function in Program.cs. Ie: instead of Recording1.Start(); it should be Recording1.<your function name>;
In fact Record and playback is not preferable. You can use it just to get an idea for code.
Lets move to somewhat better than record and play. Ie: writing code by yourself.
Before going directly to code lets understand one thing how Ranorex work.
For any action for an element/Object, the object should exists in the Object Repository.
In case of Record and Playback Ranorex by itself add the objects in Object Repository. But now we are writing code by ourself hence, we need to add all the objects into Repository for which we are going to perform any action.
Note: There are 2 different ways as of my knowledge to work with Ranorex other than “record and playback”.
1. Adding objects into object repository and then using
repo.parent.child.action();
Note: You can refer step6 and step7 for the usage of this concept.
2. using RanoraXpath. Here, no need of object to be added in Object Repository.
Now we will go for the first one, where we will add objects into Object Repository.
So, Lets start with a small example.
Here, we will be directly writing code for a simple scenario where we will just invoke an application called “Dynatrace”.
Step1.
I have given the project name as “FirstExample”.
Step2.
Now, goto Recording1.UserCode.cs. It looks like this.

Step3.
Change the function name as InvokeApp and add “public static void” . Now it will look like this.

Step4.
Call this function in Program.cs

Step5.
Now, track the object and add it into Object Repository. To do that just goto Desktop → click on Ranorex which is in minimized state → click on Element Tree → Click on Track
It will show you desktop.
Note: When u click on Track it will show the last window which you have used before going to Ranorex.
Now, it will take you to the Ranorex Element Browser. Just right click on the selected item → select Add to Repository / Add to Repository (Inc. children) according to your need.

Step6.
Now, Goto Object Repository by Double clicking on the repository.


Step7.
Write your code inside InvokeApp function in Recording1.UserCode.cs.
namespace FirstExample
{
/// <summary>
/// The Recording1 recording.
/// </summary>
public partial class Recording1
{
public static void InvokeApp()
{
repo.DesktopExplorer.ListItemDynaTrace_AJAX_Edition.DoubleClick();
// This will work only if the object exists in desktop.
// You can see the repo.Parent.child relation in the above figure.
}
}
}
Now, Run it.
Or you can use this code to invoke the application. This is good one.
namespace FirstExample
{
/// <summary>
/// The Recording1 recording.
/// </summary>
public partial class Recording1
{
public static void InvokeApp()
{
System.Diagnostics.Process.Start("C:\\Program Files\\DynaTrace\\Dynatrace_Ajax_edition\\dynatrace.exe");
// This will work even if the object is not present in desktop. And for
this code its not necessary to place object into repository.
}
}
}
Now, Run it.
So, Now I can assume that you learnt atleast how to use Ranorex tool.
OK.. Great !!!
Here, I am going to give you some scripts with comments. You can use these code according to your need.
1. To Launch an Windows based application
System.Diagnostics.Process.Start("<full path>");
Eg: System.Diagnostics.Process.Start("C:\\Program Files\\DynaTrace\\Dynatrace_Ajax_edition\\dynatrace.exe");
2. To launch a web based application.
Eg: we want to open IE and launch gmail.
System.Diagnostics.Process.Start("iexplore.exe","www.gmail.com");
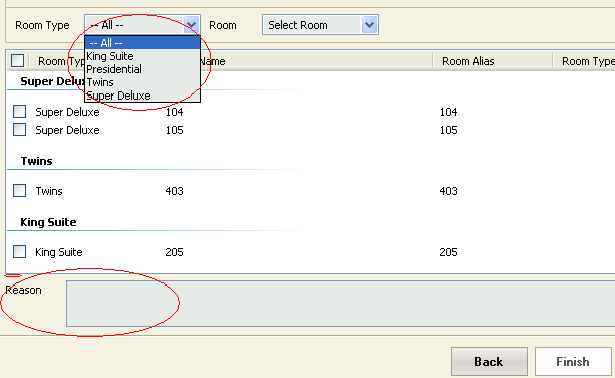
3. To set a value from drop down box.
Here, we use SelectedItemText
Eg: repo.ComboBoxCboRoomType.SelectedItemText="Deluxe";
Note: the value inside double quote must be same as it is in the drop down box.
4. To set focus on an element. Lets say we need to focus on a textbox
here, we use Focus
repo.FormOut_of_Order_Room_Wizard.TextTxtReason.Focus();
5. To Enter Text in Text box field [one way]
We use TextValue. Here, it will directly set the value.Time will be saved.
EG: repo.ContainerEwBlockRoom1.TextReason.TextValue="this is text";
6. To Enter Text in Text box field [another way]
We use keyboard.Press. It will show the text entering one by one. It is slow.
Here, we are setting focus on the text box where we need to enter text and then we are entering text.
repo.TextTxtReason.Focus(); // setting focus to text box field.
Keyboard.Press("this is Text");
7. To show some report after the completion of execution. It will not display any color.
Report.Info("<your msg>");
Eg: Report.Info("Logged in Successfully");
8. To show the report in green color which resembles test case passed.
Report.Success(”<Msg>”);
Eg: Report.Success(“Logged in Successfully”);
9. To show the report in red color which resembles Test case Failed.
Report.Failure(“<msg>”);
Eg: Report.Failure("The expected and actual value didnot match");
screenshot for report.success and report.failure
10. To capture screenshot of the error occurs in runtime
we use Report.Screenshot
Eg: Report.Screenshot(repo.FormOut_of_Order_Room_Wizard.Self);
11. To check whether a window exists.
Suppose we have to do some validation like if some window exists then do
some operations. Then we can use SelfInfo.Exists
Note: It will be helpful in “Exception Handling”
Eg: if (repo.FormEZee_FrontDesk_NextGen.SelfInfo.Exists())
{
}
12. Reusing a repository in a new project. [If you already have a repository and you want to use it in your new solution]
· create a new project [Lets say newproject]
· Right Right click on the project name → Add → Existing Item → select the repository which u want to copy [Lets say oldproject.rxrep]
· Now delete the repository which was created bydefault in the new project [lets say the repository of new project name is newprojectrepository.rxrep]
· Now rename the repository [which was copied from different location] with the same name [which is specified in the project name. Ie: oldproject.rxrep to newproject.rxrep]
· Now, in Recording1.cs file edit the following
Before Editing it looks like this
Eg: public partial class Recording1
{
public static oldprojectrepository repo = oldprojectrepository.Instance;
Now, replace oldproject with the new name.
After Editing it looks like this
public static abcRepository repo = abcRepository.Instance;
Parameterization
Suppose a scenario is like...
· need to launch an application
· Login into application [here, actual window will get open to do operations]
· click on new button
· click on next button
· select a value from combo box [Shown in the figure below]
· Click on Search Button
· write some text in text box field [Shown in the figure below]
· click on Finish Button
Note: There are 4 values in combox box and that values we will fetch from csv file. We have seen what are the different types of values present in the dropdown box and the same values we have put into csv file.
Note: The values which should be entered into text box field will also be fetched from csv file.
Note: The operation from clickin on New Button → Next Button → Setting value for ComboBox → Clicking on Search → writing text in TextBox field → Click on Finish Button will be running for 4 iterations.
To do this task lets go step wise
Step1.
Add “system.Data” header at the top in Recording1.UserCode.cs & Program.cs.
using System.Data;
Step2.
Write code for launching and logging into application in Recording1.UserCode.cs
public partial class Recording1
{
public static void Launch_app()
{
System.Diagnostics.Process.Start("C:\\Program Files\\myapp\\myapp_nextgen\\myapp.exe");
}
}
public static void Login_app()
{
repo.Formapp_MyDesk_Demo_Noti.ButtonContinue.Click();
repo.FormSystem_Environment_Selec.ButtonUse_Sample__Testing__Dat.Click();
repo.FormLogin.ButtonLogin.Click();
Report.Info("Logged in successfully");
}
Step3.
Write code for these operations in Recording1.UserCode.cs
* Click on New button
* Click on Next Button.
* Getting value for comboBox field from csv file and set the value.
* Click on Search Button.
* Getting value for text box field from csv file and set the value.
* Click on Finish Button.
public static void roomtype_ReasonTextBox()
{
repo.Formapp_MyDeskAsterisk__.ButtonNew.Click();//clicking on New Button
repo.FormOut_of_Order_Room_Wizard.ButtonNext.Click();//clicking on next Button
Recording1.SetRoomType(); //control goes to SetRoomType function
repo.form_order.PictureObjbtnSearch.Click(); // Clicking on search button
repo.Form_outOfRoom_Wizard.TextTxtReason.Focus();//setting focus to text box
Recording1.SetReason(); // Control goes to setReason function
repo.FormOut_of_Order_Room_Wizard.ButtonFinish.Click();//Click on Finish Button
}
public static string RoomType
{
get; set;
}
public static void SetRoomType()
{
var csv_value=""; // Declaring a variable.
csv_value=(RoomType); // storing the value from csv file to this variable.
repo.Form_order.ComboBoxCboRoomType.SelectedItemText=csv_value;// passing the value of csv_value to the ComboBox
} // Control goes to “repo.PictureObjbtnSearch.Click()” which is mentioned in roomtype_ReasonTextBox()
public static string Reason
{
get; set;
}
public static void SetReason()
{
Keyboard.Press(Reason); // Writing text into Text box field as the focus is made into Text Box field which is mentioned in roomtype_ReasonTextBox()
}
Note: All these code [mentioned in Step1 and Step2] should be inside Recording1 class.
Step4.
Add CSV file and CSV connector by performing these steps
· Right click on Classname [shown in figure below]

· Click on Add → Existing Item
· Select types of file as “all files” at the bottom
· Now goto Ranorex path “C:\Program Files\Ranorex 2.3\Samples\DataDrivenTest\C#”
· select CSVConnector and TestData.csv → Open
· Click on Copy
Step5.
Now, Double click on TestData.csv and put the values into CSV file.
It looks like this


Step6.
Call the functions in try method under Program.cs and also add the code mentioned below.
try
{
Recording1.Launch_app();
Recording1.Login_app();
CSVConnector csvConnector = new CSVConnector(@"..\..\TestData.csv");
foreach(DataRow row in csvConnector.Rows)
{
Recording1.RoomType = row["ROOMTYPE"].ToString(); //ROOMTYPE is the ColumnName [in CSV file]for the values which should be set in the RoomType comboBox
Recording1.Reason = row["REASON"].ToString(); // REASON is the ColumnName [in CSV file] for the values which should be entered in Reason TextBox field
Recording1.roomtype_ReasonTextBox(); // This is the function which is going to iterate for 4 times
}
}
Step7.
Now, Run it.